Flatfield Correction
The flatfield module performs a flatfield correction as described in Hobson, et al. The function outputs \(I_{Corrected}\) using the following equation:
The input \(I_{Measured}\) is the acquired image, while \(I_{Dark}\) and \(I_N\) are calibration images. To prepare these calibration images, see Flatfield Inputs below. The paths to these calibration images must be specified in the paths section of the configuration file. Enable flatfield correction by adding a flatfield section to the configuration file with the image bit depth specified.
Table of Contents
Flatfield Inputs
Several flatfield calibration images should be collected for each channel to be corrected. Similarly, several dark images (i.e., camera aperture closed) should be collected for the system. Experimental details on collecting these images can be found in Hobson, et al. Once the sets of images are collected, they are averaged to create \(I_{flatfield}\) and \(I_{dark}\), respectively. The ImageJ macro described below performs this averaging while creating the required \(I_N\) input image. \(I_N\) is a normalized flatfield image, calculated as:
\[I_N = \frac{I_{Flatfield}-I_{Dark}}{<I_{Flatfield}-I_{Dark}>}\]where \(<>\) indicates the mean intensity value of the enclosed image.
ImageJ Macro
When averaging the collected calibration images, it is best to use ImageJ’s 32-bit type for more precision. Additionally, \(I_N\) must be saved as a 32-bit image as fractional values are necessary for the flatfield correction. To help keep the type conversions consistent, we provide an ImageJ macro that will perform all necessary calculations. This plugin takes as input all collected dark images as a multi-image tiff file (e.g., 100 dark images saved as a single tiff file) and a single tiff stack per channel of flatfield images.
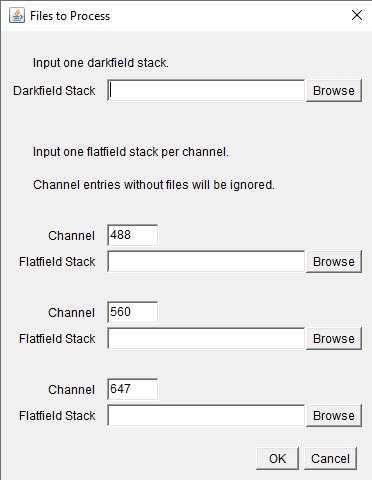
To use, run the flatfield_inputs.ijm macro. A GUI will open, as shown in the figure below. You can specify the darkfield image in multiple ways: (i) use the Browse button to find the stack of darkfield images, (ii) copy the full path into the box, or (iii) simply drag and drop the image file onto the darkfield line of the GUI. Repeat this process for the flatfield stacks. Any channel entries without files will be ignored. The macro will average the stacks and save a file called DarkAverage.tif in the same folder as the input darkfield stack. The macro will then continue to perform the \(I_N\) calculation, saving one I_N_###.tif file per channel in the same folder, with ### specified by the values in the Channel input line of the macro GUI. These files can then be specified in the paths section of the pipeline configuration file to run the flatfield correction module.
Reference
Hobson, C. M., Guo, M., Vishwasrao, H. D., Wu, Y., Shroff, H. and Chew, T.-L. (2022). Practical considerations for quantitative light sheet fluorescence microscopy. Nat Methods 1-12. doi:10.1038/s41592-022-01632-x
Usage
Pipeline: Configuration File
This is an example portion of a configuration file that sets up the inputs to the flatfield module and enables the module.
{
  "paths": {
      "root": "/aic/instruments/llsm/pipeline-test/",
      "flatfield": {
          "dir": "Calibration",
          "dark": "DarkAverage.tif",
          "laser": {
              "488": "I_N_488.tif",
              "560": "I_N_560.tif"
          }
      }
  },
  "flatfield": {
      "bit-depth": 16
  }
}
Command Line Example
When directly using the flatfield module on the command line, you must specify the input and output files as well as the input calibration images. The best practice would be to also explicitly input values such as the pixel size to avoid any conflicts with default values. The example below will flatfield correct an input MOSAIC image stack.
flatfield -d /path/to/experiment/Calibration/DarkAverage.tif -n /path/to/experiment/Calibration/I_N_488.tif -x 0.108 -q 0.21462536238843902 -o /path/to/experiment/flatfield/scan_Cam1_ch0_tile0_t0000_flatfield.tif -b 32 -w /path/to/experiment/scan_CamA_ch0_CAM1_stack0000_488nm_0000000msec_0004732481msecAbs_000x_000y_000z_0000t.tif
Flatfield Options
usage: flatfield [options] path

Allowed options:
  -h [ --help ]                    display this help message
  -d [ --dark ] arg                dark image file path
  -n [ --n-image ] arg             N image file path
  -x [ --xy-rez ] arg (=-1)        x/y resolution (um/px)
  -q [ --image-spacing ] arg (=-1) z-step size of input image
  -o [ --output ] arg              output file path
  -b [ --bit-depth ] arg (=16)     bit depth (8, 16, or 32) of output image
  -w [ --overwrite ]               overwrite output if it exists
  -v [ --verbose ]                 display progress and debug information
  --version                        display the version number